
Payment methods for fee collection (cash, UPI, cheque, bank)
Set up Cash, UPI, Cheque, Card and Bank Transfer in Pathshala, upload your own UPI QR, and choose which modes staff can record.
Payment methods are the ways your institute takes money: cash at the counter, UPI, cheque, card or bank transfer. In Pathshala, every fee payment you record is tagged with one of these methods, so your day-book and reports can show the money by mode.
The same page also holds the Online payments panel, where you connect your own payment gateway. That part has its own guide: Online payments.
#Where to find payment methods
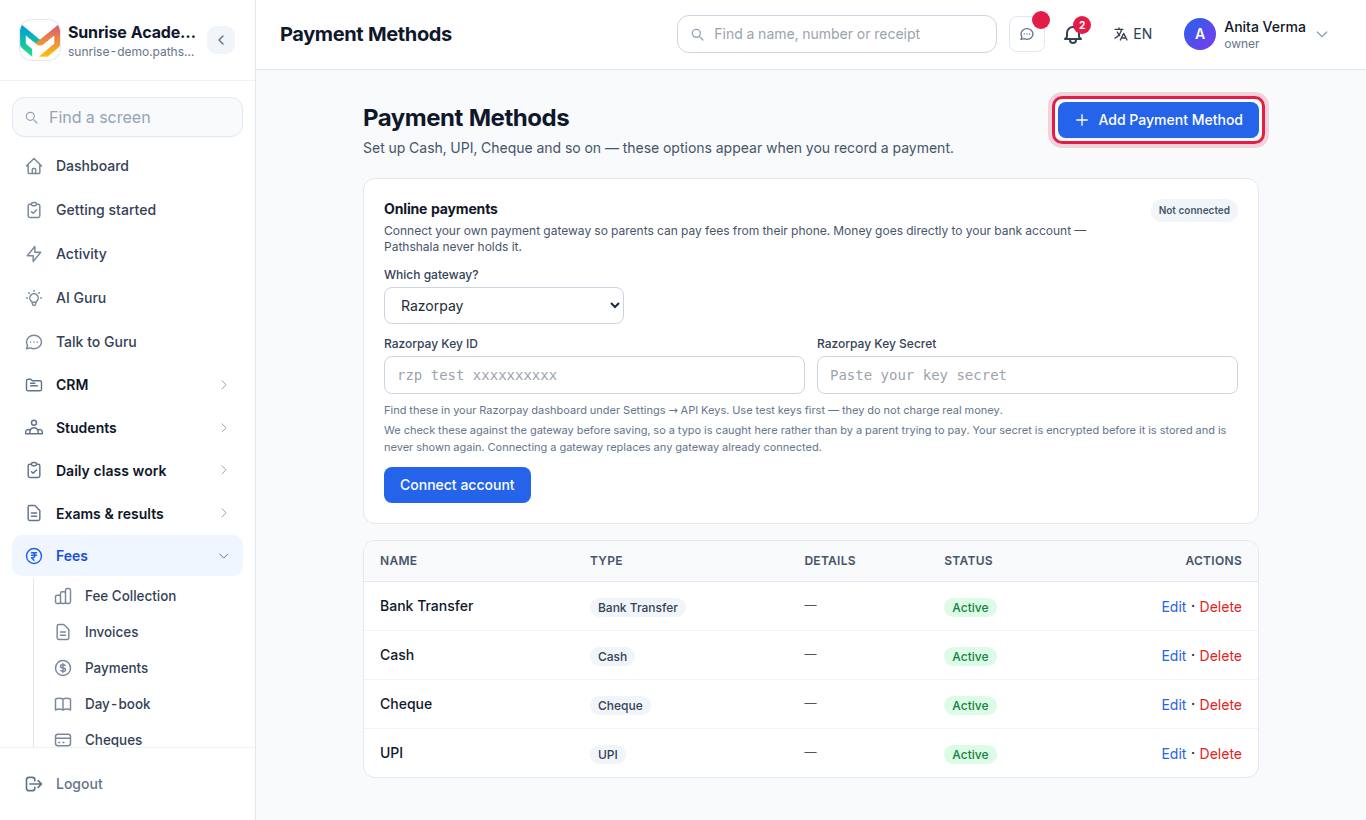
The page lists your methods in a table with the columns Name, Type, Details, Status (Active or Inactive) and Actions (Edit · Delete).
If you have no active method yet, the page shows a warning at the top. Add one before anybody tries to record a payment.
#Which payment method types are there?
| Type | Use it for | Extra details you can save |
|---|---|---|
| Cash | Money taken at the counter | A note |
| UPI | Payments to your UPI ID or QR | UPI ID, your own QR image, a note |
| Bank Transfer | NEFT / IMPS / RTGS into your account | Account Holder Name, Bank Name, Account Number, IFSC, a note |
| Card | Card machine (POS) payments | A note |
| Cheque | Cheques you deposit | A note |
| Online Gateway | Created for you, named Online Payment, when you connect Razorpay or PhonePe | Nothing to type here — use the Online payments panel |
#How to add a payment method
- Open Apps › Fees › Fees settings › Payment Methods.
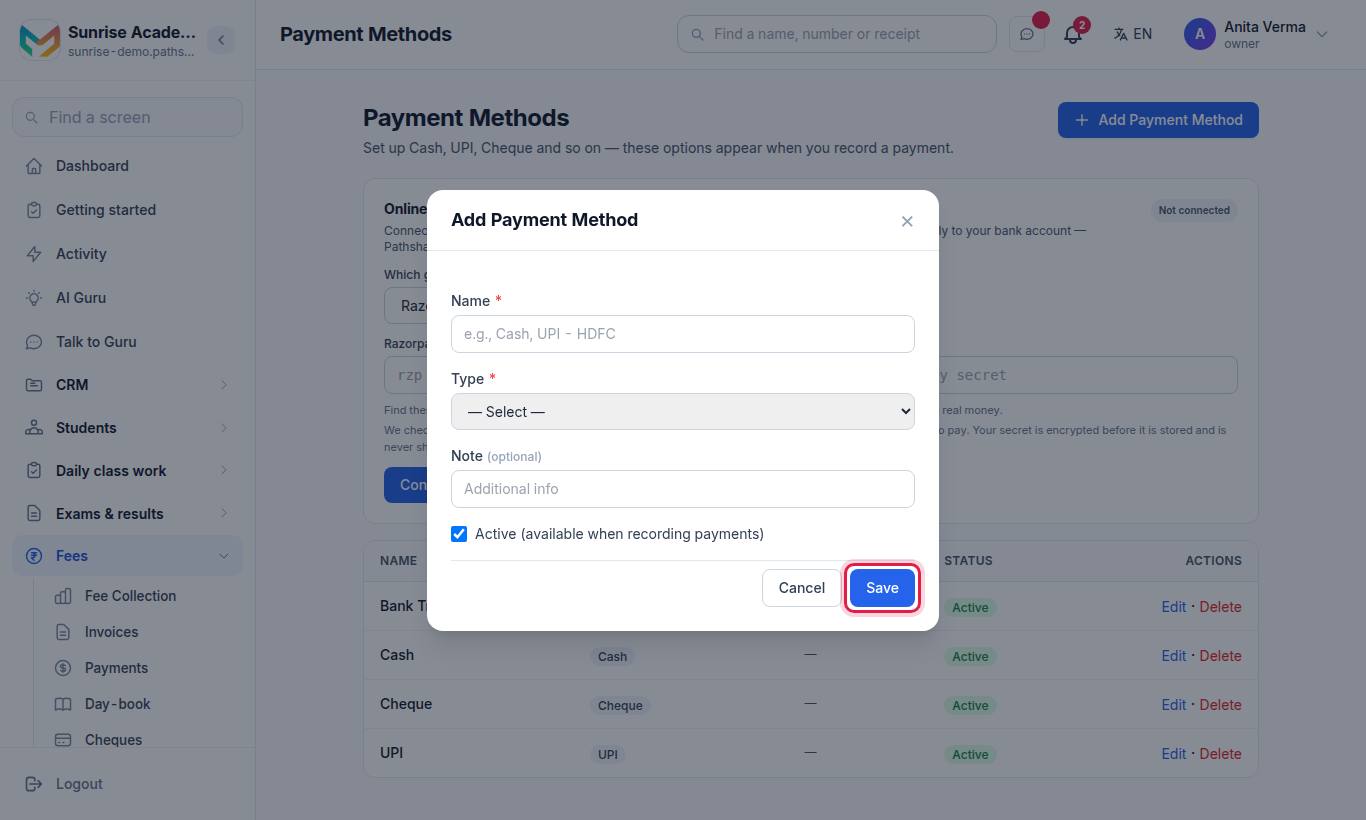
- Press Add Payment Method. If you have fewer than three methods, you can instead press one of the quick buttons: + Cash, + UPI, + Cheque or + Bank Transfer. They open the same form with the name and type filled in.
- Type a Name that staff will recognise, for example "Cash" or "UPI - HDFC".
- Choose the Type.
- Fill in the details for that type (see below).
- Leave the Active box ticked so the method appears when staff record a payment.
- Press Save.
#UPI details
- UPI ID — for example
sunrise@sbi. It is optional if you upload a QR. - Your own QR code — a photo of the QR on your counter. Parents scan this one instead of the code Pathshala builds from your UPI ID.
#Bank Transfer details
- Account Holder Name (optional), Bank Name, Account Number and IFSC (for example
SBIN0001234). - Fill in both the account number and the IFSC. A bank needs both to send money, so one on its own is not enough.
#How to upload your own UPI QR code
The QR can only be added to a method that is already saved.
- Add the UPI method and press Save.
- Press Edit on that method to open it again.
- Press Upload QR and choose a PNG or JPG image of up to 2 MB.
- You will see "QR code saved" and a preview of the image.
To change it, press Replace QR. To take it off, press Remove — parents then see the QR generated from your UPI ID instead.
#How to edit, turn off or delete a method
- Edit — change the name, details or Active tick. The Type cannot be changed after saving; add a new method instead.
- Turn off — untick Active and press Save. The method stays in your history but staff can no longer pick it.
- Delete — press Delete and confirm. If the method was used on earlier payments, Pathshala makes it inactive instead of deleting it, so old receipts and reports stay correct.
#What parents see
When a parent opens a bill on the parent page or in the MJX Parent app:
- If you have an active UPI method, they see your UPI ID, a QR to scan, and an Open my UPI app button.
- Pathshala uses your first active UPI method for this.
- A UPI payment does not confirm itself. The parent reports it with I have paid, and your office confirms it on the payment claims screen.
#When MJX collects for your account
Some accounts (mostly those selling online courses through MJX LMS) are set up so that MJX collects the money and passes it on to the institute's bank. On those accounts:
- the Add Payment Method button is replaced by a note: MJX collects for this account;
- the methods already on the page still work for recording a payment;
- a box at the top shows where your bank verification stands, with a link to Bank details & KYC documents (the Getting paid & KYC page). See Online payments.
#Who can use this page?
| Action | Who |
|---|---|
| Open the page | Owner, Admin, or staff given the Manage Payment Methods permission |
| Add, edit, delete a method, upload a QR | Owner and Admin (or a role given Manage Payment Methods) |
| Connect an online gateway | Owner and Admin only |
Payment methods, UPI and the QR are on every MJX Fees Management plan, including Forever Free.
#Tips
- Add Cash first, then UPI. Most Tier-2 institutes take most of their fees these two ways.
- Name methods by where the money lands ("UPI - HDFC", "UPI - SBI") if you have more than one account. It makes the day-book easy to match against bank statements.
- Do not create a method called "Online" by hand. Connect a gateway instead, and Pathshala creates the Online Payment method for you.
#Questions people ask
Do I need to add a payment method before I can collect a fee?
Yes. When you record a payment you pick one of your active payment methods. Add at least one, and Cash is the usual first one.
Can parents scan my own UPI QR code instead of a generated one?
Yes. Open your UPI method, upload a photo of the QR from your counter (PNG or JPG, up to 2 MB), and parents see that QR on their pay screen.
What happens if I delete a method that was already used?
Pathshala does not erase it. A method used on earlier payments is made inactive so the payment history stays correct. An unused method is deleted for good.
Who can change payment methods?
Owners and admins can add, edit and delete methods. Other staff with the Manage Payment Methods permission can open the page.