
From enquiry to admission
How a school enquiry becomes an admitted student in Pathshala — the enquiry form, the Admit button and the admission form, step by step.
In Pathshala, an admission starts as an enquiry and ends as a student record. You never re-type the family's details: the enquiry's name and phone number carry straight into the admission form, and the enquiry is marked converted when you save.
This page covers the step from enquiry to student. For managing leads, follow-ups, the AI reply on WhatsApp, visits and web forms, see the CRM docs.
#How do enquiries come in?
| Way in | Where it lands |
|---|---|
Your public enquiry form at <your-code>.pathshala.mjxtechnologies.com/inquire | Enquiries list |
| A message on your WhatsApp number | Enquiries list, with the AI reply if switched on |
| Typed in by the front desk | Enquiries list |
| Your website, Facebook, Google and other connectors | Enquiries list (see CRM) |
For a school, the standard enquiry form asks for Parent Name, Parent Phone, Parent Email (optional), Student Name and Class Interested In (Nursery to Class 12). A coaching centre's form asks for the Target Exam instead, and a college's for the course applied for.
#How to admit an enquiry from the enquiry page
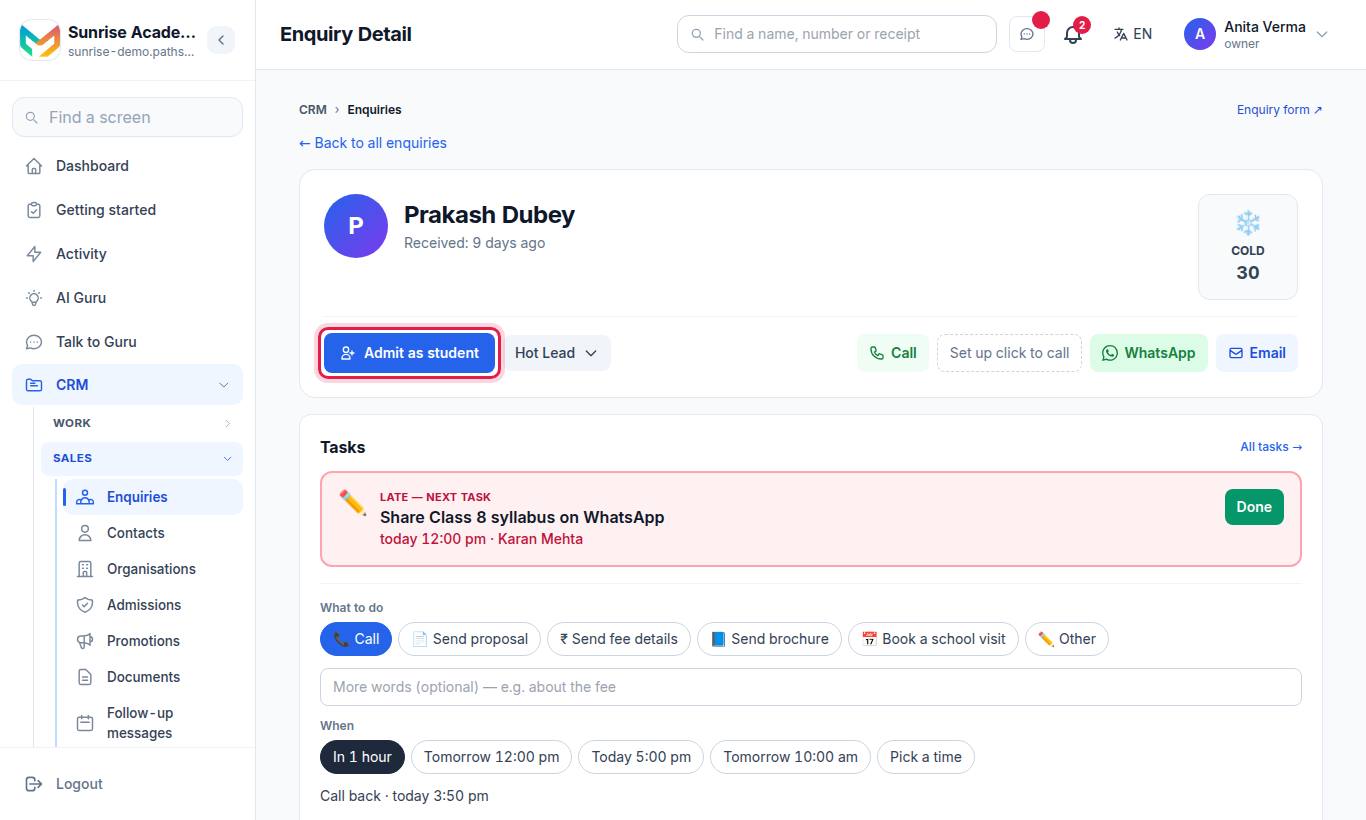
- Open the enquiry from your Enquiries list.
- Press Admit as student (a coaching centre sees the same button; the word follows your institution type).
- The admission form opens with a blue band saying Converting from enquiry and the family's details filled in.
- Fill the missing parts (see the form steps below) and press Convert to Student.
The Admit as student button is shown only while the enquiry is open (not already converted or marked lost) and only to people allowed to admit students.
#How to admit from the Students screen
If you work from the student list, you can convert several enquiries one after another.
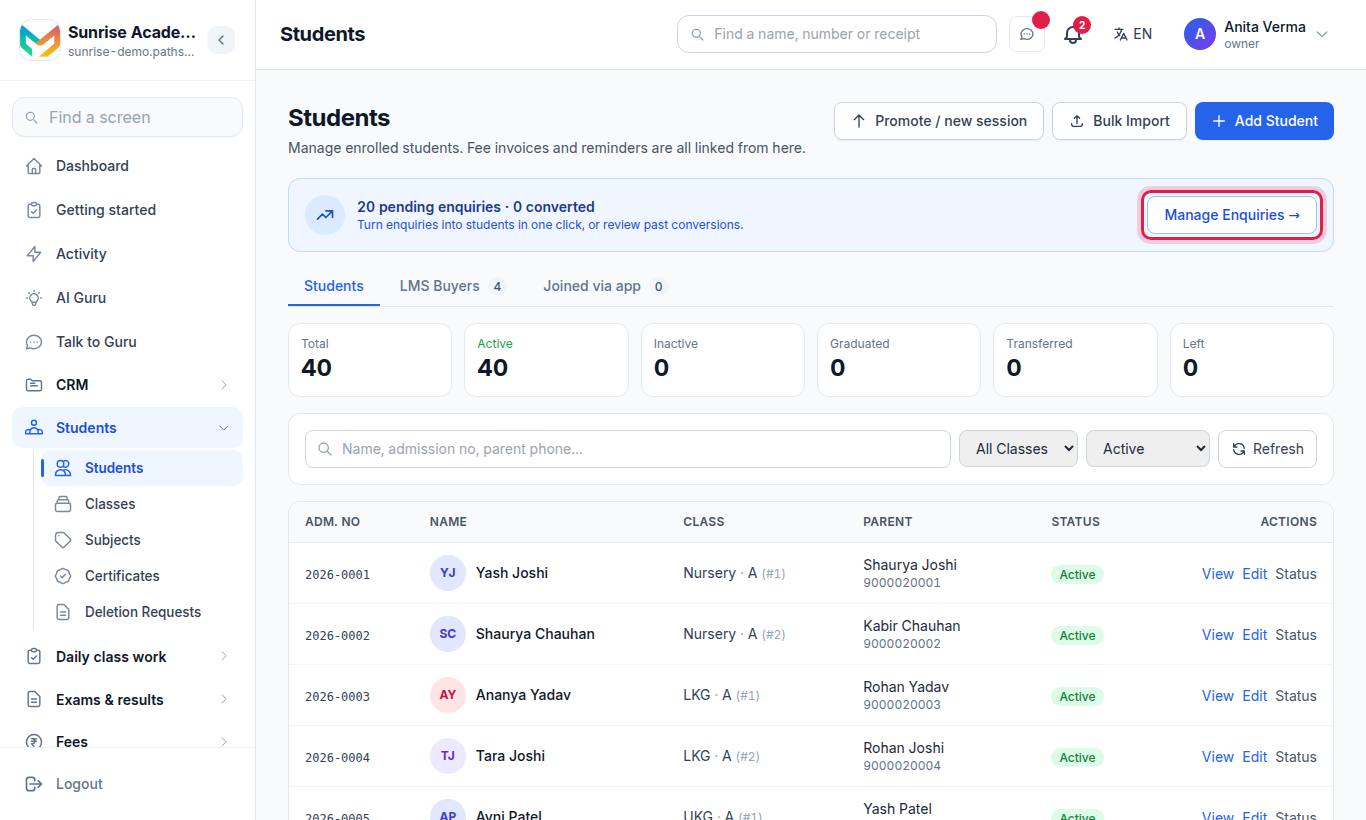
- On the Students page, the band at the top shows how many enquiries are pending and how many are converted. Press Manage Enquiries →.
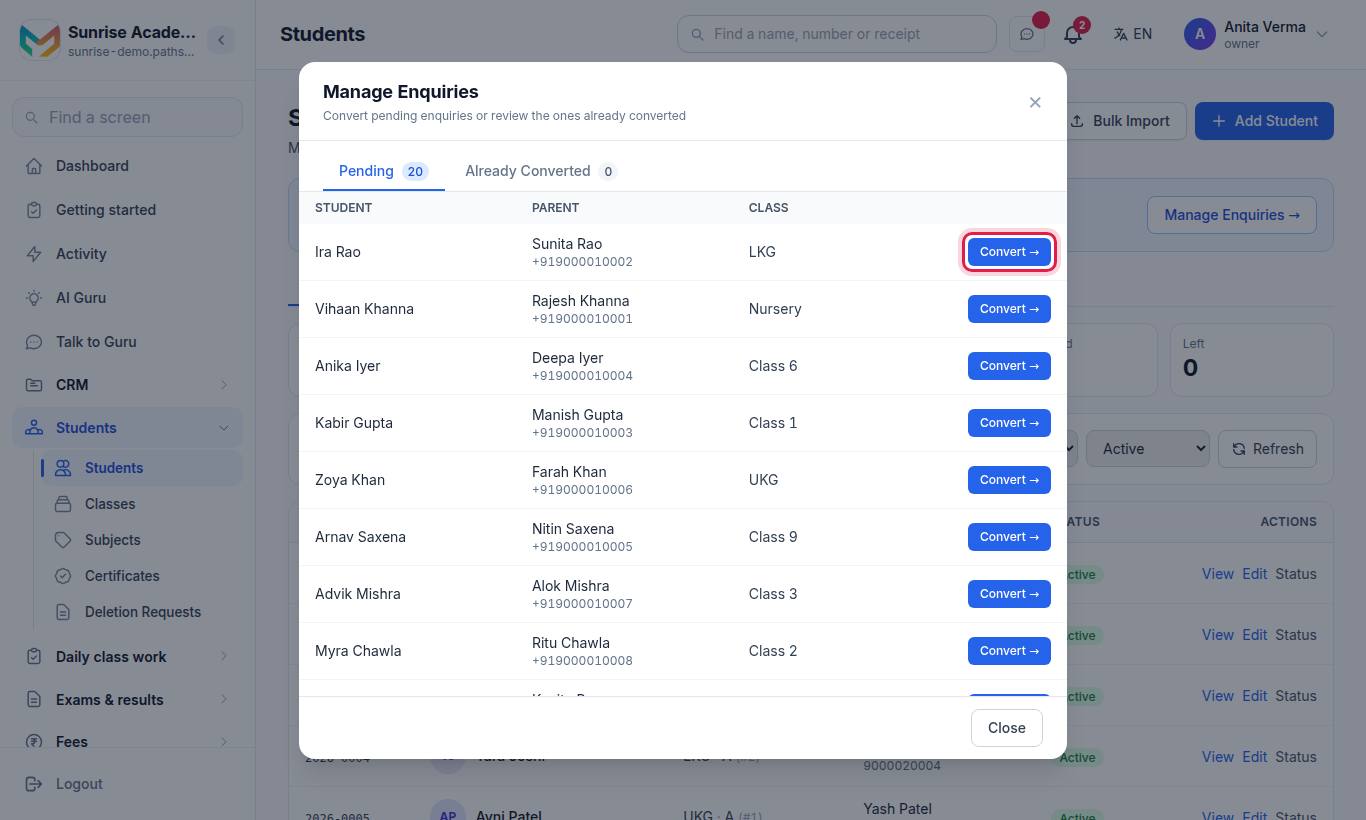
- The Pending tab lists every enquiry not yet admitted, with the student's name, the contact and the class asked for.
- Press Convert → on a row. The admission form opens, filled in.
- The Already Converted tab shows each converted enquiry beside the student it became, with a View → link.
#The admission form, step by step
A new admission is a five-step form: Basics, Admission, Contact, Details (optional) and Review. Press Next and Back to move; the last step, Check before you save, shows everything once more.
| Step | What you fill |
|---|---|
| Basics | First, middle and last name, date of birth, gender, blood group, photo |
| Admission | Admission number, roll number, class, section, academic year, admission date |
| Contact | Primary contact name and phone (WhatsApp), email, WhatsApp number if different, father, mother, guardian, emergency contact, student's own phone and email, address |
| Details | Category, religion, caste, mother tongue, government IDs, scholarship and bank, health, previous school, opening dues, notes |
| Review | A read-back of everything before you save |
Things that help:
- Admission number. Leave it blank and the next number is given when you save. Type your own to use it instead. Once set, it cannot be edited. Auto-numbering is set up in Settings.
- Roll number. Leave it blank and the next free roll number is given when you save. Press Use to take the suggested one.
- Section. Pick one, or type a new name (A, B, C…) and it is created for that class.
- Class from the enquiry. If the class asked for in the enquiry matches one of your classes, it is picked for you.
- The primary phone matters. Fee reminders, receipts and attendance alerts go to this number on WhatsApp.
#Verify the APAAR ID with DigiLocker
After you save an admission, open the student's edit form (Edit details). Under Government IDs & Schemes a Verify APAAR with DigiLocker button appears. The parent signs in with the student's own DigiLocker account, not their own.
- Verify now (at the desk) — sign in on the office computer with the family present.
- Send link to parent — then Copy link or Share on WhatsApp. The link is valid for 48 hours. (A skill institute, which has no parent on record, sees Send a link.)
- Check again — see whether the family has finished.
The APAAR ID fills in if the box is empty. If DigiLocker shows a different number, it is shown to you and never changed on its own.
#Who can admit?
| Action | Default roles |
|---|---|
| Open the admission form, save a new student | Owner, Admin |
| See the enquiry and the student list | Owner, Admin, Staff |
The owner can give "admit students" to another person (for example the front desk) under Sidebar › Settings › People & roles › Roles & permissions.
#Tips
- Add your classes first. If the class is not on your list, the enquiry cannot be placed in it. The Classes screen lists classes "Asked about in your enquiries" that are missing — tap one to add it.
- Admit on the day the fee is paid, so the first bill and the register start together.
- Keep the enquiry for history. A converted enquiry stays on record next to the student.
#Troubleshooting
| What you see | What it means | What to do |
|---|---|---|
| No Admit as student button | The enquiry is already converted or lost, your role cannot admit, or your account is set up as a business | Ask the owner, or open the student from Admitted — open the student's page |
| "Auto-numbering is off — set it in Settings" | Admission numbers are not set to be given automatically | Type the number yourself, or switch numbering on in Settings |
| The class is empty in the form | The enquiry's class does not match any class you have | Pick the class by hand, or add it on Apps › School & Academics › School settings › Classes |
#Related
#Questions people ask
Do I have to type the family's details again when I admit an enquiry?
No. Admitting from an enquiry opens the admission form with the parent's name, phone and the child's name already filled in. You only add what is missing, such as the class and section.
Who can admit a student?
By default the Owner and Admins. The owner can give the job to someone else, such as a receptionist, under Settings › Roles & permissions.
What happens to the enquiry after admission?
It is marked converted. On the enquiry page the Admit button changes to "Admitted — open the student's page".
I admitted the wrong enquiry. Can I undo it?
Yes. A student made from an enquiry by mistake can be removed with a Hard Delete request, which goes straight to the Principal for approval and frees the enquiry again.
Where do I manage leads, follow-ups and the AI replies?
That is the enquiry and CRM side of Pathshala. See the CRM docs.